Sunday, August 25, 2019

August Soap Challenge

It looked so easy when Amy did it on the video! Who would have thought it would take me five attempts this month to get three soaps I felt good about entering?  Well, the first two tries I did a 33% water discount instead of a 33% lye solution. That was on me. The third time I did the 33% lye solution but my piping soap was still too thick. The fourth time I left the wax out of the recipe. Each time I made the recipe I only stick blended maybe 10 seconds and it was at thin trace.  I would pour the batter into cups with colorants. I would stir the colors into the cups and within just a few minutes the soap would be ready to transfer into piping bags.  I would start on my design and SHAZAM! The soap would suddenly be too thick to work with.  So frustrating!  I didn't know what I was doing wrong, but after the fourth try I was tired of it so I was ready to go with what I had.  A couple of days went by and I thought about what it said in the recipe instructions about the lye solution,,,,,"30% lye solution--I would decrease the water to make a 33% lye solution if you're doing colors to help reduce ash"  SHAZAM!! That's it!  I needed to increase the water!  I had one more try in me and here I am again - down to the wire.  Yes, it's Saturday, August 24 and I'm on attempt Number 5.  And here they are:

This is what inspired me:


I actually wanted to paint a soap to look just like this teacup, but the design is too small and inticate.  Not that I didn't try.  Here are all my attempts: 


You can see the one that sort of looks like the teacup in the upper right corner.  The second one was the one in the foreground and then the third was the one that looks like rainbows.  Then I thought, "What am I? A third grader?" Not to insult any third graders that might be reading this but I am waaaaaaay past 8 years old.  The soaps in the background are my first attempt at ombre.  I won't even go into that....

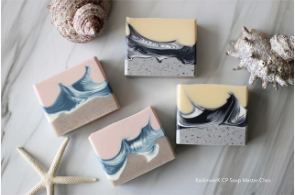
And I do have to mention that with all these attempts my soap was aging by the day making it more difficult to get the piping soap to stick.  The last two attempts I was planing each bar before I would pipe the soap and wiping them with rubbing alcohol.  Here are the close ups:


SHAZAM!!!

I'm happy with these.

I have less than 3 hours to submit my entry....

Saturday, July 27, 2019

July Soap Challenge

This month's soap challenge is to make pointy layers in the soap and was taught by guest instructor Teri Endsley of Tree Marie Soapworks.  I was super excited about this one because I had seen pointy layers in the soaps of master soap makers like these:


These were made by @kadinwerk from Korea or China. Not really sure. I had wondered how these middle layers were made and wanted to learn how.  I still have some questions about the placement of the white in these bars, but let's continue.  Teri provided a recipe and it was perfect for making pointy layers.  I made sure to follow the instructions to a T.  I knew right off that I wanted to make an ocean soap.  These are my inspiration soaps by @meehue:


I knew my first batch would just be for practice, but I was pleasantly surprised with the results.


What I didn't like about this soap was that the sky was too dark so that there wasn't enough contrast and the blues of the ocean were reversed from how I wanted them.  The lighter blue was on top of the darker blue.  Also, it doesn't show in this bar, but in the other bars there was too much sand. The scent was Refreshing Eucalyptus from Bramble Berry and the micas were all from Mad Micas - Tahitian Teal, Key West and Twilight.  The sand was a little bit of yellow silt clay and ground walnut shells.

Batch Two:


Whoops! Here's what went wrong here - I got in a hurry and put my lye solution in an ice water bath and it got too cold - 68 degrees.  When I added it to my 85 degree oils my hard oils started to solidify.  I started to stick blend and, afraid of over blending I under blended and my batter was too thin.  Too thin! I have never had batter that was too thin in my almost 2 1/2 years of soap making.  So my colored soap and my white soap just mixed together and you can't even tell there are three different colors of water.  I had the idea of adding white to the sky batter to try to make clouds and I kind of like the Van Gogh-like effect but the waves are so light that there still is not enough contrast and the aqua part just looks creepy.  Also, I don't like that the clouds are sitting on top of the flat soap. Oh, and my fragrance was Ocean Shores from Bramble Berry's Pacific Northwest collection. Apropos, don't you think?

Batch Three:

 I got the contrast I wanted and I started spooning the clouds on top while the soap was still jiggly, but still too much mixing of the white and the colors.  Also, my mind wandered when I started to pour the sky (I have adult ADD) and I poured too much sky batter all at once so all I have here is one. point.  I really thought this was going to be my last batch. Hah!

Batch Four:


I did something really stupid here that I can't believe I did....I got cocky and mixed my fragrance oil into my entire bowl of batter right from the start to "save time".  WHAT WAS I THINKING?  Of course, you all know what happened, right?  I think it's obvious.  Do I have to say it?  I had decided that I didn't like the sand layer flat so I made furrows.  Looks better, don't you think? All this time I had been mixing my colorants into my soap one layer at a time and by the time I got to the blues I think you can see what happened.  OK, I'll spell it out:  The soap thickened up.  I just dumped the two blues into the same pitcher and poured them in and then poured the sky.  It's still pointy...but it looks more like a blue mountain than an ocean.  I was so disgusted with myself I didn't even want to waste my cloud mixtures that were sitting on the side so I just moved it out of the way and started on batch number 5.

Batch 5:


So close!  I got smart and mixed my colorants into each layer before I started pouring.  I will always do that from now on. I ran out of Ocean Shores so I switched to Cactus Flower (from Bramble Berry, naturally) which actually worked really well with this design.  Still too much mixing with the white and the colors, but look at those pointy layers!!  Oh, and I also ran out of my Mad Micas Twilight and Key West so I had to switch to Bramble Berry's Caribbean Blue and Blue Mica.  I still had enough of Mad Micas Tahitian Teal, thankfully because it was the perfect color and I didn't want to take a chance changing it.  Also, have you noticed the color of the sand getting lighter?  I was wanting to get that Southern California pale sand color. I almost stopped here, but I thought about it and thought, no, if I want a chance to win (and who doesn't, am I right?) I really have to give it one more shot.  I have to say I added one more step to Batch  -  Prayer. Yes, I realized I needed help from my Heavenly Father so that I would be able to focus on what I was doing and not make any stupid mistakes.  I was nervous as I began the pour.....

Batch 6:


When I cut this batch I was so excited I was screaming, whooping and hollering, because it was exactly how I wanted it.  When I look at this soap I can't think of another thing that I could have done to make it better.  Good thing because I was really getting tired of doing this labor intensive design and all the clean up involved.  Who can relate?  It's a good thing I started early because I never would have thought I would be making six batches to get soapy perfection!  Each layer is defined, not too much white, light colored not flat sand, correctly tinted sky, and puffy white clouds. So, what's next?  The photography.  It's a beach soap so....


Here I am at the beach taking pictures of my soap.  My husband took this picture so he could send it to our son and a coworker to make fun of me.  The coworker texted back, "We are all crazy in our own special way." So true!


These photos are the exact colors my phone took them in - no filters, no editing.


We were at Morro Bay, California


Then I had to treat my husband to an expensive lunch for taking the day off work to accompany me to the beach.  Really?  He didn't mind the 40 degree temperature difference?  This was the view from our table.  We always eat at the Moonstone Grill in Cambria when we go to the coast.
Then we went to San Simeon because I thought some pier shots would be awesome, but by that time the sun was on the wrong side. These photos are totally edited but still nice:

Thanks for going on my soapy journey with me, and if you're still reading this thank you for reading the whole enchilada!


Saturday, June 22, 2019

June Soap Challenge Club Entry

UPDATE:  I was showing my next door neighbor my soaps from the July Challenge and I mentioned that I considered these soaps "flops". I thought they smelled bad and they're ugly.  She picked one up and said that she liked the scent so I gave her a couple of bars.  She loves them and she came over the next night after washing her face with it and she smelled great.  Go figure.  Beauty is in the eye of the beholder as they say.

For the June Soap Challenge I chose to enter the Advanced category which meant I had to use a drink in place of the water in my lye solution and a food in my soap at a rate of 1 part food to 8 parts oils.  The colorants and fragrance had to be all natural as well.  I chose to use goat milk as the drink and whipped cream as the food in the hopes that my soap batter would stay white. 

First let me say I had to do a lot of experimenting to find out what didn't work.  I went to my local health food store and bought $20 worth of teas that I thought would color my soap - spirulina, hibiscus, stinging nettle, alfalfa, rose petal, and several others.  That was very time consuming because I first had to grind everything except the spirulina and sift and label them. Then I made slurries with boiling water.  I should have used a light oil. They mostly just turned the soap dull, icky colors.  They didn't smell very good either.  I also tried using an apple avocado baby food in one batch with an essential oil blend and prepared oatmeal with straight lemon essential oil in another batch.  I wasn't happy with either batch.

Last weekend I had to go out of town for a family wedding so that left me with a time crunch at the end which is the way it always seems to go for me.  I should be used to it by now!  So here's what I ended up doing:

For my fragrance I used patchouli, bergamot, cedarwood, and lavender essential oils.

For my colorants I used Purple Brazilian clay, Kaolin clay, Rose clay, and Jagua Blue extract


I'm blending the clays with distilled water


Measuring out my sodium lactate


I use lard for it's moisturizing properties and slower trace


The rest of my oils were coconut, olive, canola, sweet almond, and castor 
Here's my whipping cream. I used the 1 part to 8 parts of oils

I'm pretty experienced with whipping cream...I love whipped cream!
(Even though I'm plant based I cheat some times)

It whipped up really nice - I whipped it pretty stiff.

I had goat milk already frozen in ice cube trays at the ready.  I keep in in freezer bags so I can just pull it out when I want to use it in soap. I used goat milk 100%.

I use the standard 5% lye discount

I calculated that heavy cream is 70% water and subtracted that amount from my goat milk.  I should have had an ice water bath ready for when the lye would be melting the frozen milk extra fast, but I didn't think of that ahead of time unfortunately, and when the milk started to heat up I panicked and dumped the milk/lye solution in the oils before the lye was completely dissolved.  What a dumb thing to do! When I realized what I had done I pulled out some cheese cloth and strained the undissolved lye out of the soap.  But the milk was getting super hot and as I was squeezing the soap through the cheese cloth I could feel the heat.

Crisis is over and I'm mixing in the whipped cream.  But you can see that my soap is already a dark yellow color and the whipped cream won't do much to change it.

Colorants are mixed in and I'm attempting a Taiwan swirl.  I've never done it before, but I can already tell my soap batter is getting too thick.  Still, I hope for the best and continue on.

I filled the mold as full as I could because I know the dividers displace a lot of soap.

Taking out the first divider


Taking out the last divider

I'm dragging my stick around the edges of the mold...
Not much of a Taiwan Swirl...as I suspected the batter is too thick

I inserted my skewer all the way into the soap and made an "S" shaped design through the soap to get some kind of acceptable design.....
I then spritzed it with 91% alcohol, and I decided to insulate it and push gel phase in the hope of getting my soap hard enough to cut, plane and bevel before the deadline and also to hopefully get my colors to look good.

Miraculously, the next day when I got home from work the soap was just barely hard enough to unmold and cut

If you look closely you can see the soap looks sticky....
And there they are....they smell scorched

Two days later... hard enough to plane and bevel and the scorched smell is gone.  What does "scorched" smell like?  Did you ever have a perm?  Like that.
This was the look I was hoping for.....it's OK to laugh.